Manuel Guilbault's Blog
Deploying an Aurelia app on Azure using VSTS
In this serie:
- Hosting an Aurelia app on Azure
- Deploying an Aurelia app on Azure using VSTS (this post)
- Adding deep linking support to an Azure Functions-based Aurelia app
- Adding Let’s Encrypt to an Azure Functions-based Aurelia app (coming soon)
In my previous post, I explained how to host an Aurelia application on Azure for very cheap.
In this post, I’ll explain how to use Visual Studio Team Services (VSTS) to easily deploy a static website or SPA application to Azure.
We’ll start by automating the creation of our Azure infrastructure using an Azure Resource Manager template, then we’ll script our Azure Functions proxy app. Lastly, we’ll create a build definition and a release definition in VSTS to automate the whole deployment process.
You’ll need a VSTS account to follow the third part of this post.
You can get the sample Aurelia app I used for this post here. Additionally, this repository contains some files used for deployment on Azure in the
azuredirectory. More on this later.
The Azure Resource Manager template
We can imagine that this application is part of a larger system. In such a context, we probably would want to deploy this system on additional environments such as development, staging, integration, and so on. However, in the previous post, I created the Azure infrastructure manually using the Azure portal. It makes our infrastructure unreplicable, and makes creating those other environments tedious and error-prone.
Azure offers a piece of technology called Azure Resource Manager (ARM) templates. An ARM template is a JSON file that describes a set of Azure resources to deploy, along with how they depend on each other, so they can be deployed in the right order. Additionally, if a given Azure resource already exists, the ARM API is intelligent enough to simply update it so it matches the new definition. Thanks to this, a stateful resource such as a Blob storage or a SQL database won’t lose its state.
We’ll start by creating an ARM template to define the whole Azure infrastructure we manually created in the previous post.
First, we’ll create an azure directory in our Aurelia application, in
which we’ll create the following azuredeploy.json file:
{
  "$schema": "https://schema.management.azure.com/schemas/2015-01-01/deploymentTemplate.json#",
  "contentVersion": "1.0.0.0",
  "parameters": {
  },
  "variables": {
  },
  "resources": [
  ],
  "outputs": {
  }
}
This is the standard ARM template skeleton. A template can have input parameters,
and can define variables. Of course, it is pretty useless if it doesn’t define
some resources. Finally, it can export some outputs.
In addition to this structure, a template can use a rich expression syntax to access resources’ properties, compute values from others, or access variables or parameters. You can get more familiar with ARM templates by checking the official documentation.
The parameters
Let’s add the following parameters:
appName: the name of the Azure Function app service. It must be globally unique, as it will be used in the web app’s domain name. This parameter will be optional, as its default value will be generated by the template.storageAccountName: the name of the Storage account that will store the application’s files. It must be globally unique. This parameter will be optional, as its default value will be generated by the template.storageAccountType: the replication type of Blob Storage account. This parameter will be optional, as its default value will beStandard_LRS(see locally redundant storage).blobContainerName: the name of the Blob Storage container in which our Aurelia application files will be stored. This parameter will be optional, as its default value will beweb-app-content.
To add those parameters, simply replace the parameters object with the following:
{
  "appName": {
    "type": "string",
    "defaultValue": "[uniquestring('manuelguilbault.com', 'aurelia-azure', resourceGroup().id, 'webapp')]",
    "metadata": {
      "description": "The name of your proxy webapp."
    }
  },
  "storageAccountName": {
    "type": "string",
    "defaultValue": "[uniquestring('manuelguilbault.com', 'aurelia-azure', resourceGroup().id, 'storage')]",
    "metadata": {
      "description": "The name of the Storage account."
    }
  },
  "storageAccountType": {
    "type": "string",
    "defaultValue": "Standard_LRS",
    "allowedValues": [
      "Standard_LRS",
      "Standard_GRS",
      "Standard_RAGRS"
    ],
    "metadata": {
      "description": "The type of Storage account"
    }
  },
  "blobContainerName": {
    "type": "string",
    "defaultValue": "web-app-content",
    "metadata": {
      "description": "The name of the blob container where the web app is stored."
    }
  }
}
It is important to note that the
uniquestringfunction used to generate the default value of theappNameand thestorageAccountNameparameters computes a deterministic value based on its arguments. Since App Service and Storage account names must be globally unique on Azure, you’ll most certainly need to change the set of arguments passed to thoseuniquestringcalls if you want to deploy this template.
The variables
Next, let’s use those parameters and define some variables that we’ll use in the description of the resources we wish to deploy:
{
  "functionAppName": "[parameters('appName')]",
  "hostingPlanName": "[parameters('appName')]",
  "storageAccountName": "[parameters('storageAccountName')]",
  "storageAccountType": "[parameters('storageAccountType')]",
  "blobContainerName": "[parameters('blobContainerName')]"
}
Simply replace the variables object with the previous snippet in the template.
As a rule of thumb, I always assign each parameter to a variable, so the
resourcesdeclarations never directly depend on parameters but only on variables. This makes the template easier to change, as you can easily add or remove parameters and change how a variable’s value is computed without having to change multiple resource declarations.
The resources
Our template will declare 3 different resources: a Storage account, a hosting plan, and a functions app. Let’s see how this looks like:
[
  {
    "type": "Microsoft.Storage/storageAccounts",
    "name": "[variables('storageAccountName')]",
    "apiVersion": "2017-06-01",
    "location": "[resourceGroup().location]",
    "kind": "Storage",
    "sku": {
      "name": "[variables('storageAccountType')]"
    }
  },
  {
    "type": "Microsoft.Web/serverfarms",
    "apiVersion": "2015-04-01",
    "name": "[variables('hostingPlanName')]",
    "location": "[resourceGroup().location]",
    "properties": {
      "name": "[variables('hostingPlanName')]",
      "computeMode": "Dynamic",
      "sku": "Dynamic"
    }
  },
  {
    "type": "Microsoft.Web/sites",
    "apiVersion": "2015-08-01",
    "name": "[variables('functionAppName')]",
    "location": "[resourceGroup().location]",
    "kind": "functionapp",
    "dependsOn": [
      "[resourceId('Microsoft.Web/serverfarms', variables('hostingPlanName'))]",
      "[resourceId('Microsoft.Storage/storageAccounts', variables('storageAccountName'))]"
    ],
    "properties": {
      "serverFarmId": "[resourceId('Microsoft.Web/serverfarms', variables('hostingPlanName'))]",
      "siteConfig": {
        "appSettings": [
          {
            "name": "AzureWebJobsDashboard",
            "value": "[concat('DefaultEndpointsProtocol=https;AccountName=', variables('storageAccountName'), ';AccountKey=',listKeys(resourceId('Microsoft.Storage/storageAccounts', variables('storageAccountName')), providers('Microsoft.Storage', 'storageAccounts').apiVersions[0]).keys[0].value)]"
          },
          {
            "name": "AzureWebJobsStorage",
            "value": "[concat('DefaultEndpointsProtocol=https;AccountName=', variables('storageAccountName'), ';AccountKey=', listKeys(resourceId('Microsoft.Storage/storageAccounts', variables('storageAccountName')), providers('Microsoft.Storage', 'storageAccounts').apiVersions[0]).keys[0].value)]"
          },
          {
            "name": "WEBSITE_CONTENTAZUREFILECONNECTIONSTRING",
            "value": "[concat('DefaultEndpointsProtocol=https;AccountName=', variables('storageAccountName'), ';AccountKey=', listKeys(resourceId('Microsoft.Storage/storageAccounts', variables('storageAccountName')), providers('Microsoft.Storage', 'storageAccounts').apiVersions[0]).keys[0].value)]"
          },
          {
            "name": "WEBSITE_CONTENTSHARE",
            "value": "[toLower(variables('functionAppName'))]"
          },
          {
            "name": "FUNCTIONS_EXTENSION_VERSION",
            "value": "~1"
          },
          {
            "metadata": {
              "comment": "This will enable proxy functions. See https://github.com/Azure/Azure-Functions/issues/356"
            },
            "name": "ROUTING_EXTENSION_VERSION",
            "value": "~0.2"
          },
          {
            "name": "WEBSITE_NODE_DEFAULT_VERSION",
            "value": "6.5.0"
          },
          {
            "name": "Storage.HostAndContainer",
            "value": "[concat(variables('storageAccountName'), '.blob.core.windows.net/', variables('blobContainerName'))]"
          }
        ]
      }
    }
  }
]
The first object in the array describes the Storage account, and the second the hosting plan. Here, the
hosting plan uses the Dynamic SKU, so the pricing is calculated based on the consumption.
The third object describes the Functions app acting as a proxy in front of the Storage container. It contains a couple of interesting details:
- The
dependsOnarray contains the ID of the first and second resources. This is to make sure that the web app is provisioned only once the Storage account and the hosting plan have been deployed. - The
appSettingsarray contains all the application settings that are either static values or that are known in the scope of the ARM template.
You can simply replace the value of the resources property in the template with the previous snippet.
The outputs
Depending on which parameters are specified when the template is executed, some resource names may be generated by the template. However, some of those names may be required by the release pipeline. As such, we’ll output those names, so the release pipeline can gather them up after the template is deployed and use them in further release steps:
{
  "AppService.Name": {
    "type": "string",
    "value": "[variables('functionAppName')]"
  },
  "Storage.Account.Name": {
    "type": "string",
    "value": "[variables('storageAccountName')]"
  },
  "Storage.Container.Name": {
    "type": "string",
    "value": "[variables('blobContainerName')]"
  }
}
Just replace the value of the outputs property in the template with the previous snippet.
The Azure Functions app
In the previous post, we created the Azure Functions proxy app manually through the Azure portal. In order to make our deployment automatic and replicable, we need to script it.
In your Aurelia app root directory, create the following file structure:
azure
└── functions-app
    ├── host.json
    └── proxies.json
In functions-app/host.json, just put an empty JSON object:
{}
In functions-app/proxies.json, put the following:
{
  "$schema": "http://json.schemastore.org/proxies",
  "proxies": {
      "default": {
          "matchCondition": {
              "route": "/{*path}"
          },
          "backendUri": "https://%Storage.HostAndContainer%/{path}%Storage.SasToken%"
      },
      "root": {
          "matchCondition": {
              "route": "/"
          },
          "backendUri": "https://%Storage.HostAndContainer%/index.html%Storage.SasToken%"
      }
  }
}
This will have the exact same result as what we did using the Azure portal in the previous post.
Visual Studio Team Services
Now that our ARM template and our Functions app are ready, we can start creating our build and release pipelines in VSTS.
If you’re not familiar with VSTS, let’s just say that it supports two different types of pipelines: builds and releases. A build pipeline’s job is to process some source code and to create one or more build artifacts out of it. A release pipeline’s job is to take one or more build artifacts and to deploy them to a hosting environment. In our case, this hosting environment will be Azure.
Build and release pipelines are made of tasks. A task has a set of settings, based on its type, and
variables can be used in those settings. A variable is accessed using the $(variable_name) notation.
You’ll see examples of this later.
For the following part, you’ll need to host your Aurelia app along with the
azuredirectory containing the ARM template and the Functions proxy app on a Git repository. VSTS supports a couple of different providers, such as GitHub or Bitbucket. However, unless you already created a Git repository somewhere else, the simplest solution is to create a Git repository on VSTS and to push your code there.
If you never did it before, you’ll need to authorize VSTS to deploy on your Azure subscription. You can follow this blog post.
The build pipeline
A build pipeline is a sequence of tasks, which should publish one or more build artifacts.
Creating the build definition
In VSTS, go to Build and Release, then Builds, then New. You’ll be asked to choose a template.
Just select Empty process.
VSTS will show the following screen, where the Process tab is selected in the left panel:
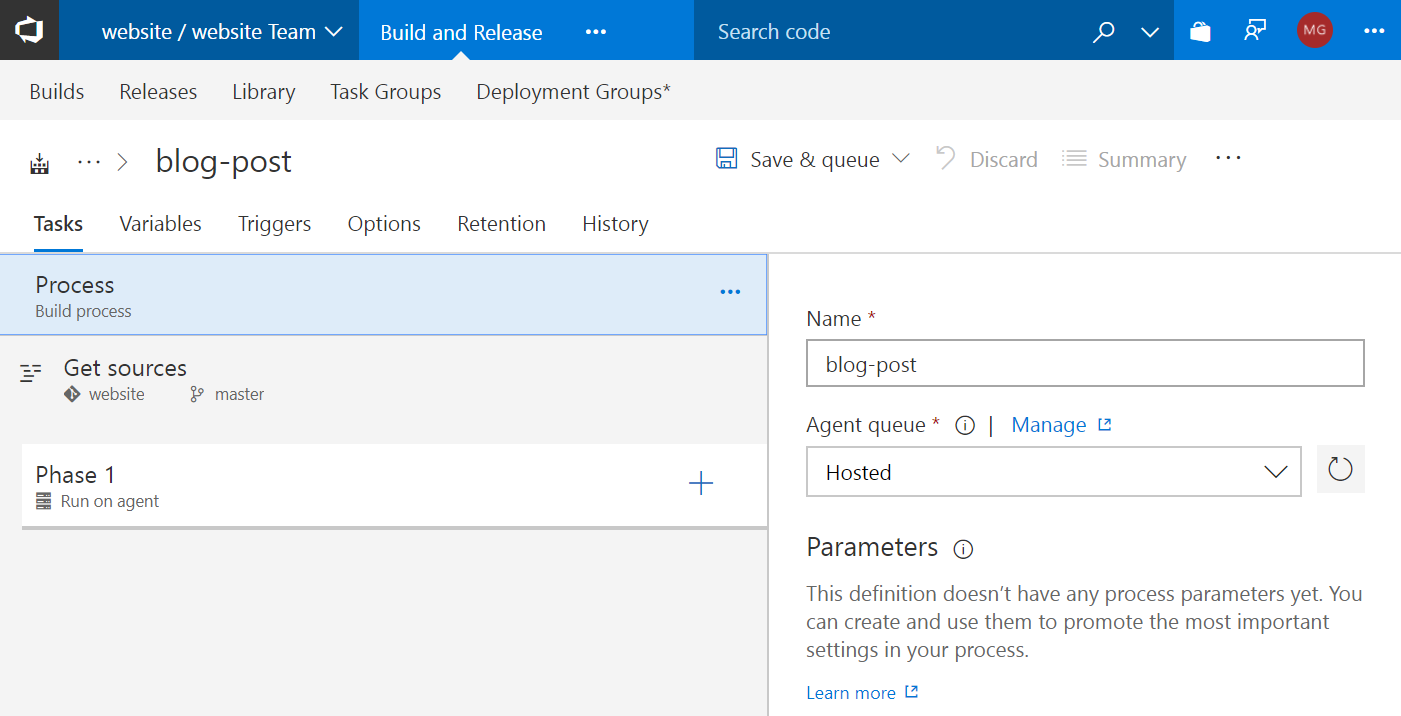
First, give a name to your build pipeline and select the Hosted agent queue.
Then, click on the Get sources tab in the left panel. You’ll see the following screen:

Here, select the repository from which your code will be fetched. Selecting This project will
allow you to pick a Git repository from your VSTS project (that’s what I did).
Adding the tasks
Next, we’ll add tasks to our build pipeline. Clicking the + button sitting beside the Phase 1
tab in the left panel will display the task selection screen. You can browse the available tasks,
or use the search bar. After you find the task you want to add, you just have to click its Add
button, and the task will appear in the left panel. You can then select the task in the left
panel and its configuration form will show up in the right panel.
Here’s the list of tasks, along with their respective properties, to add to the build pipeline. The order must be respected. Any property not listed here should be left with its default value.
| Task type | Property | Value |
|---|---|---|
| npm | Command | custom |
| Command and arguments | install -g aurelia-cli | |
| npm | Command | install |
| Command Line | Tool | au |
| Arguments | build --env prod | |
| Copy Files | Source Folder | $(System.DefaultWorkingDirectory) |
| Contents | scripts/**/* favicon.ico index.html |
|
| Target Folder | $(Build.ArtifactStagingDirectory) | |
| Publish Build Artifacts | Path to publish | $(Build.ArtifactStagingDirectory) |
| Artifact name | drop | |
| Delete Files | Source Folder | $(Build.ArtifactStagingDirectory) |
| Contents | ** | |
| Copy Files | Source Folder | $(System.DefaultWorkingDirectory) |
| Contents | azure/**/* | |
| Target Folder | $(Build.ArtifactStagingDirectory) | |
| Publish Build Artifacts | Path to publish | $(Build.ArtifactStagingDirectory) |
| Artifact name | azure |
Once you are done adding the list of tasks, click the Save button.
To summarize, this pipeline will first install the Aurelia CLI, then will restore the application’s
dependencies and transpile and bundle the app. Next, it will create two artifacts: a first one named
drop, which will contain the application’s files, and a second named deploy, which will contain
the ARM template, the Azure Functions app, and other scripts that our release pipeline will use.
The release pipeline
The release pipeline is linked to a source, which in our case will be build artifacts, and is made of one or more environments, which can be connected together in sequence or in parallel. Each environment is a sequence of tasks, just like a build pipeline.
Installing VSTS extensions
To make our release pipeline as simple as possible, we’ll install two extensions from the VSTS marketplace: ARM Outputs and Azure App Service: Set App settings. The first extension will add a release task that retrieves the output of an ARM template deployment and exposes them as VSTS variables, making them available to the next tasks in the sequence. The second extension will add a release task allowing to update the App settings of an App Service in Azure. Those two extensions are free and open source.
To install the extensions, just follow the two links and, for each, click Install and follow the process.
Creating the release definition
Once this is done, go to Build and Release, then Releases, click on Create release definition and select
Empty process. VSTS will ask you to create a first environment:
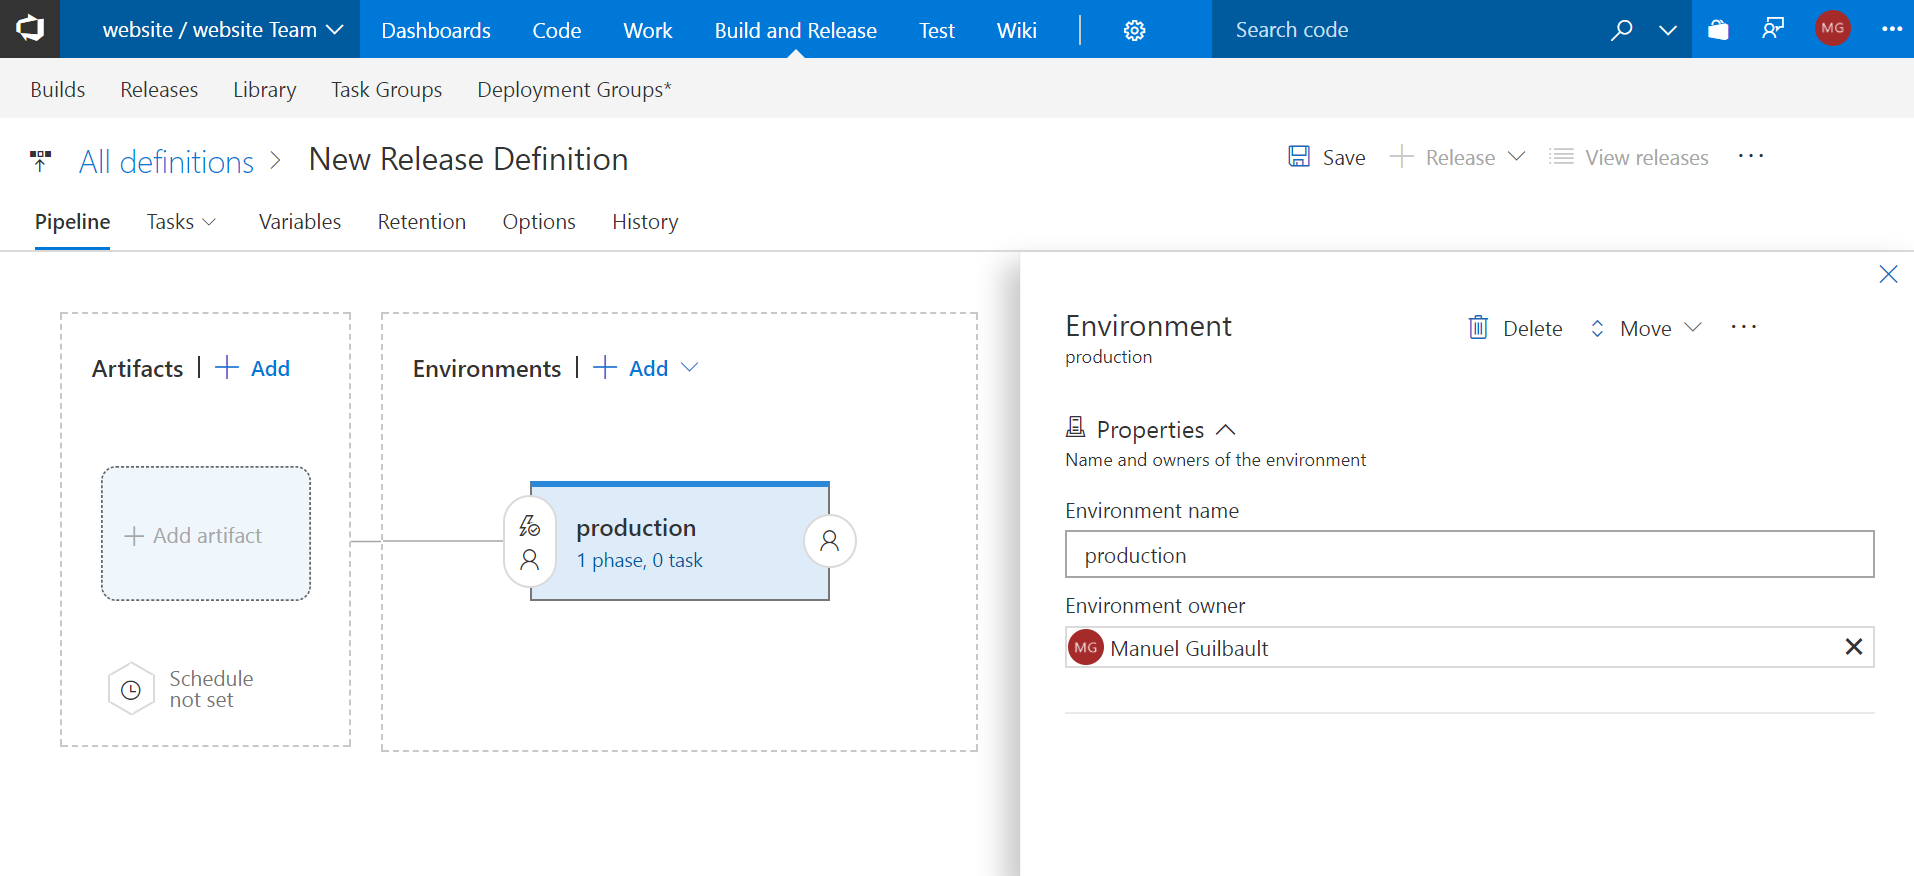
For the sake of this post, let’s just create a single production environment, so go ahead and change the
name to production.
Linking the build artifact
Next, let’s link our release pipeline to our build pipeline. Click on Add artifact and fill the fields as follows:
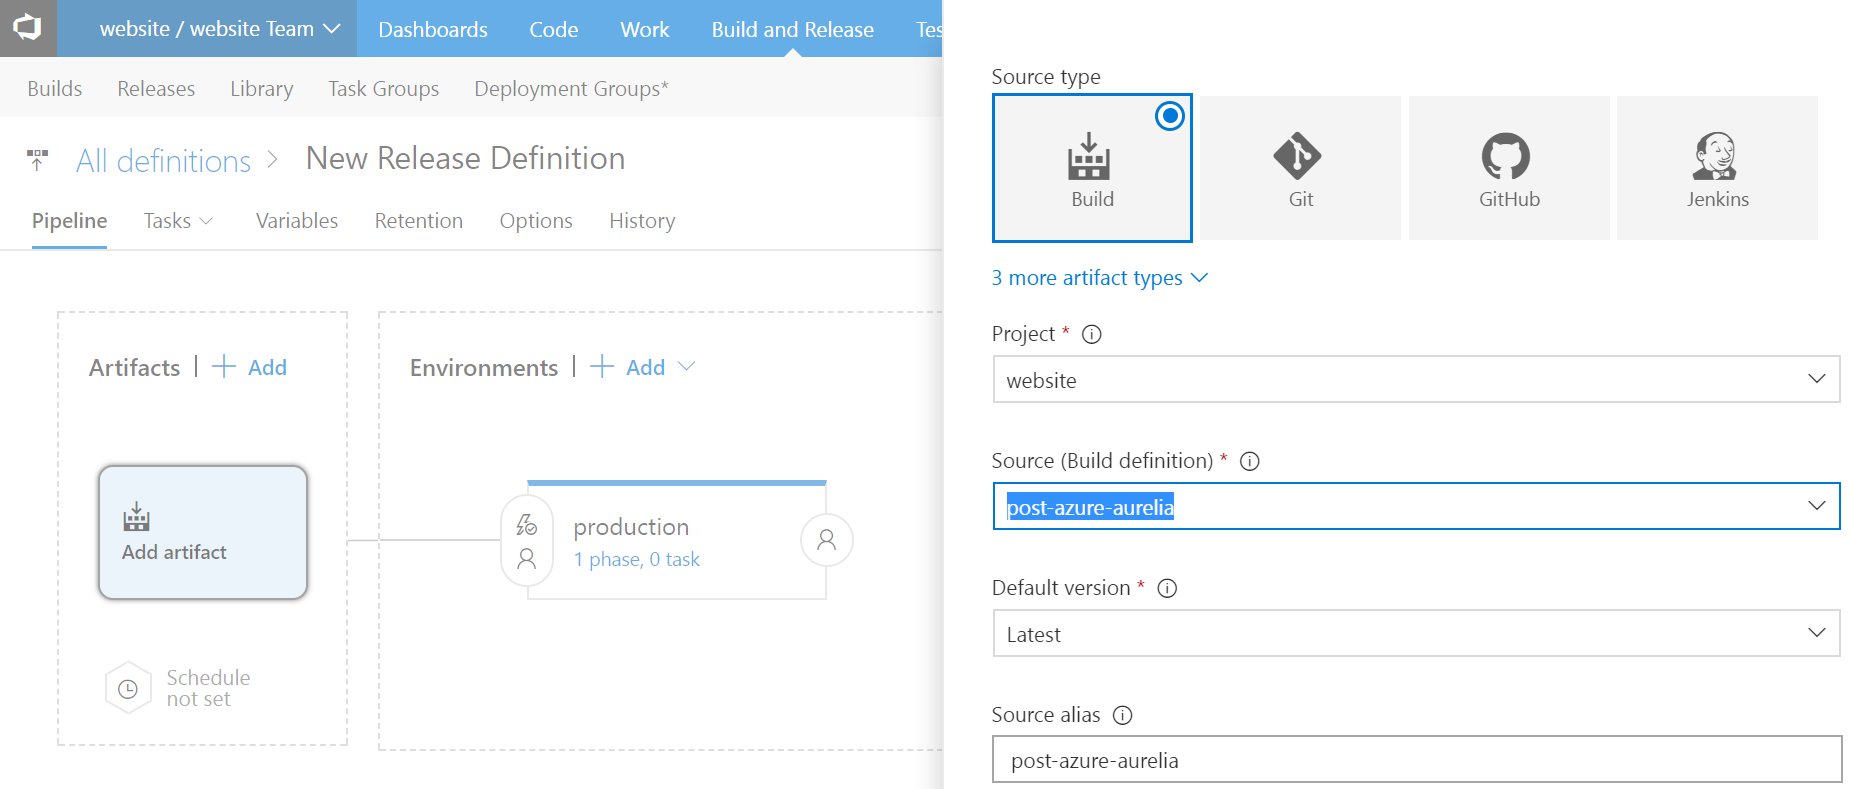
Here, you should select the proper VSTS project in the Project field, and your new build definition in the Source field. You can leave the other fields to their default values.
Next, let’s enable continuous deployment by clicking on the lightning icon on the top right corner of the new linked artifact and by enabling continuous deployment:
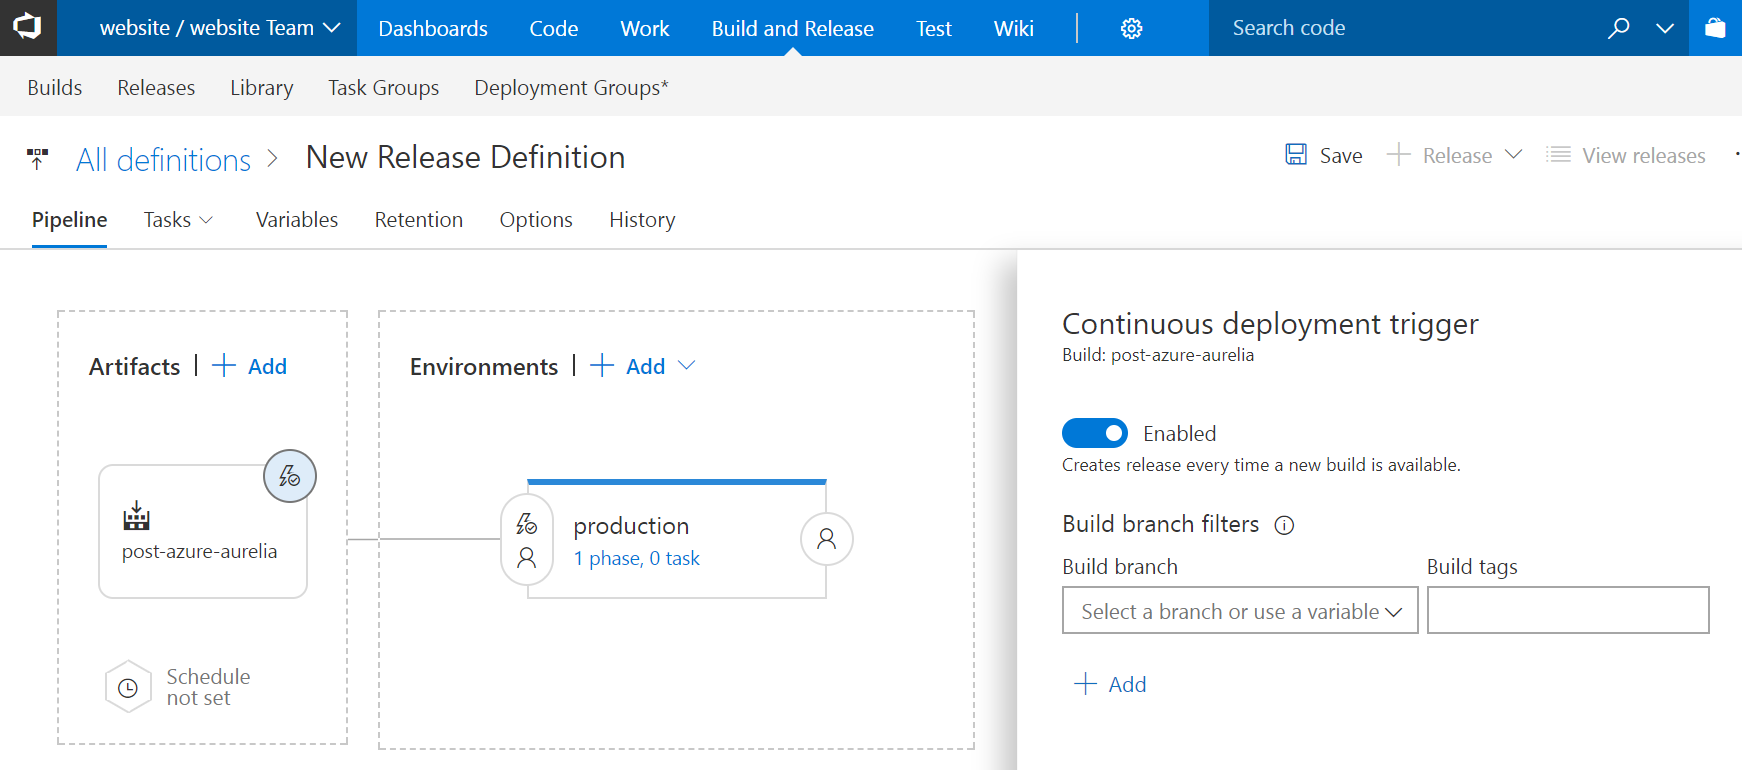
Thanks to this, every time a new build is completed successfully, the release pipeline will be triggered automatically.
Adding variables
Next, let’s create some variables to make our release pipeline easier to maintain. Select the Variables tab,
then Process variables, and Add the following rows:
| Name | Value |
|---|---|
| AppService.Name | The unique name for your application. This will be the subdomaine of azurewebsites.net used to access to your app. For example, I put manuelguilbault-blog-post-aurelia-azure here, so the URL to my app is http://manuelguilbault-blog-post-aurelia-azure.azurewebsites.net |
| ResourceGroup.Name | The name of the resource group on which the application’s resources will be deployed. I used blog-post-aurelia-azure-production here. |
| BuildArtifact.Name | The value of the Source alias field when you linked the build artifact. By default, this is the name of the build pipeline to which our release pipeline is linked. Here I used post-azure-aurelia. |
Then, click Save.
Creating an environment
Lastly, let’s create the task sequence for our production environment. Go back to Pipeline and
click on the 1 phase, 0 task link in the production environment box. VSTS will show a screen
that is very similar to the one we used to add tasks to our build pipeline. It works the same way.
Here’s the sequence of tasks, along with their properties, to add to the release pipeline:
| Task type | Property | Value |
|---|---|---|
| Azure Resource Group Deployment | Azure subscription | Select your Azure subscription. |
| Resource group | $(ResourceGroup.Name) | |
| Location | Select the location where you want to deploy your app. Here I used West Europe. |
|
| Template | $(System.DefaultWorkingDirectory)/$(BuildArtifact.Name)/deploy/azure/azuredeploy.json | |
| Override template parameters | -appName $(AppService.Name) | |
| ARM Outputs | Azure Connection Type | Azure Resource Manager |
| AzureRM Subscription | Select your Azure subscription. | |
| Resource Group | $(ResourceGroup.Name) | |
| Outputs to process | Storage.Account.Name, Storage.Container.Name | |
| Azure File Copy | Source | $(System.DefaultWorkingDirectory)/$(BuildArtifact.Name)/drop/ |
| Azure Connection Type | Azure Resource Manager | |
| Azure Subscription | Select your Azure subscription. | |
| Destination Type | Azure Blob | |
| RM Storage Account | $(Storage.Account.Name) | |
| Container Name | $(Storage.Container.Name) | |
| Additional Arguments | /SetContentType | |
| Azure PowerShell | Azure Connection Type | Azure Resource Manager |
| Azure Subscription | Select your Azure subscription. | |
| Script Type | Script File Path | |
| Script Path | $(System.DefaultWorkingDirectory)/$(BuildArtifact.Name)/deploy/azure/tools/generate-sas-token.ps1 | |
| Script Arguments | -ResourceGroup $(ResourceGroup.Name) -StorageAccount $(Storage.Account.Name) -StorageContainer $(Storage.Container.Name) -Permission r -ExportTo Storage.SasToken | |
| Azure App Service Deploy | Azure Subscription | Select your Azure subscription. |
| App Service Name | $(AppService.Name) | |
| Package or folder | $(System.DefaultWorkingDirectory)/$(BuildArtifact.Name)/deploy/azure/functions-app/ | |
| Publish using Web Deploy | Check it. | |
| Remove additional files at destination | Check it. | |
| Azure App Service: Set App settings | AzureRM Subscription | Select your Azure subscription. |
| Azure App Service | $(AppService.Name) | |
| Resource Group | $(ResourceGroup.Name) | |
| App Settings | Storage.SasToken=’$(Storage.SasToken)’ |
Once you are done adding the list of tasks, click the Save button.
To summarize, this pipeline will first provision the Azure resources using our ARM template. It will then
retrieve the template’s outputs and add them as VSTS variables, so they are available to the next tasks.
After this, it copies the content of the drop artifact to the Blob Storage container, then generates
a long-lived SAS token so the proxy app has permission to read the Blob Storage container’s content. This
generated SAS token is assigned to yet another VSTS variable. Lastly, the proxy app is deployed on the
Azure Functions App Service and its app settings are updated with the Storage container SAS token. At this
point, the application is fully deployed and ready to be used.
You may have noticed that the ARM template deployment task overrides the
appNameparameter. This is so the app’s domain name is predetermined. However in some scenarios, such as if we add a custom domain to the app, we could leave this parameter out and let the ARM template generate the app name.
Generating a Storage SAS token
You may have noticed that the fourth task expects a PowerShell script at azure/tools/generate-sas-token.ps1.
This script is called with the resource group, the Storage account name, and the Storage container
name as parameters. It is expected to generate a SAS token with read permissions on the Storage
container and to assign this token to the Storage.SasToken VSTS variable.
The content of this script is pretty straightforward if you’re familiar with Azure Powershell:
Param(
  [string] $ResourceGroup,
  [string] $StorageAccount,
  [string] $StorageContainer,
  [string] $Permission,
  [string] $ExportTo
)

$key = Get-AzureRmStorageAccountKey -ResourceGroupName $ResourceGroup -Name $StorageAccount
$context = New-AzureStorageContext -StorageAccountName $StorageAccount -StorageAccountKey $key[0].Value
$sasToken = New-AzureStorageContainerSASToken -Name $StorageContainer -Permission $Permission -Context $context -ExpiryTime (Get-Date).AddYears(100)
Write-Host "##vso[task.setvariable variable=$ExportTo]$sasToken"
The script starts by fetching the access keys for the Storage account, then it creates a context object for the
Storage account using the primary access key and creates a new SAS token, setting the expiration 100 years in
the future. Lastly, it writes a VSTS command to the standard output so the SAS token is assigned to a VSTS
variable whose name was passed as the ExportTo parameter.
Don’t forget to push this file to your Git repository.
Building & releasing
Once your code is pushed, and the build and release pipelines are created, you can go back to
Build and Release, then Builds. If you move your mouse over the row of the build definition we
created earlier, you’ll see a ... button appear. Click on it, then click on Queue new build in the
contextual menu, and confirm the dialog that will show up by clicking on Queue.
Once the build is completed, you can go to Releases. A new release should start automatically if
you properly enabled continuous deployment earlier. Once the release completes, you can then go to
your Azure portal to make sure everything was deployed properly.
You can also fire up your favorite browser and navigate to http://your_app_name.azurewebsites.net/
to test your app running on Azure.
Conclusion
VSTS, Azure and ARM templates are amazing pieces of technology. When used together, not only is hosting an Aurelia application on Azure pretty cheap, but building and deploying it is fairly easy. Additionally, the build and release pipelines we created here can be enhanced to do much more. For example, you can add a NPM task to run unit tests in your build pipeline. Or you can add a custom domain to the proxy app during release. If your app relies on the aurelia-configuration plugin, you can update your config.json file using VSTS variables just like we do with the App Service’s app settings. There are lots of extensions to perform various tasks and, when you really can’t find what you need, the Azure PowerShell API is pretty well documented.
What’s next?
If your Aurelia application uses the router in push state mode, you may have noticed that the current solution doesn’t support deep linking. In my next post, I address this problem.
In a further post, we’ll see how to add a custom domain to our app. We’ll also see how to integrate the Let’s Encrypt Azure site extension with our Azure Functions app, so we can enable HTTPS by generating an SSL certificate for free using Let’s Encrypt.
Written on December 4th, 2017 by Manuel Guilbault
Comments
comments powered by Disqus